

Courtesy www.palmettostatearmory.com
By Patrick “BabyfaceP” James
So you just picked up your first AR-15, you’ve put some rounds through it, and now it’s time to give it a cleaning. However, you are new to this and you don’t have any experience cleaning it. Well, you’ve come to the right place. We’re going to give you all the advice an ol’ timer would, without him trying to steal all of your brass. But first, I want to emphasize something before we start and that is if your AR is going to be a tool that you use for self-defense, make sure it’s clean. Clean it after every range trip. Add the cleaning process into your shooting routine.
AR-15 CLEANING TOOLS
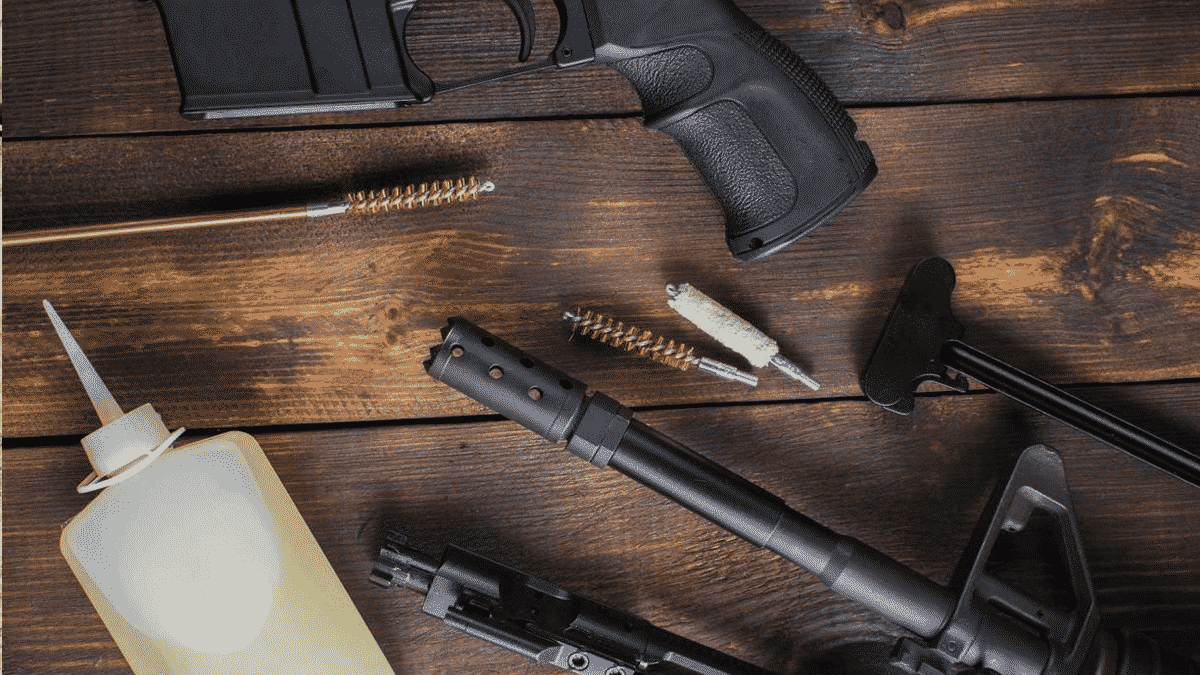
So what do you need to get started? Gun maintenance tools! Jags, cleaning rods, patches, and maybe some cool accessories. You can always improvise with a screwdriver and a cut up tee-shirt, but why bother when you can get the good stuff.
- Hoppe’s Universal Cleaning Kit – The best for a budget. These universal kits come with everything you need to clean pistols, rifles, and shotguns. Make sure you pick up the true universal one and not a rifle or pistol-specific kit.
- Brass Cleaning Jags – These are a real improvement over the plastic jags that come in most of the universal kits. The plastic jags tend to bend if you push on them too hard whereas these work on even the dirtiest barrels.
- Patches – A cut-up white tee-shirt works well in a pinch but nothing beats a big bag of patches. I usually get the larger-sized ones and cut them to size.
- Chamber brush – Gunk in the barrel extension (where the bolt locks into the barrel) can cause trouble so make sure you have some chamber brushes sitting around.
There are also some great AR-15 tools that help with take down and cleaning certain parts of the firearm:
Real Avid Critical Task Gun Tool
GUN CLEANING SOLVENTS, OILS, AND LUBES
Ready for some controversy? Don’t blow your wad on overpriced gun oils, solvents and lubes and don’t believe their hype. My personal picks are Break Free CLP and Hoppe’s No. 9 (standard, NOT the synthetic). The Hoppe’s helps break down the carbon build-up and the CLP is great for re-lubing as you are done reassembling.
SAFETY FIRST
Heavy metals are toxic and can harm you over time. A box of nitrile gloves will go a long way to keep lead from seeping into your skin and causing long-term issues.
Once you are done cleaning, ALWAYS wash up after, and don’t eat or drink while cleaning your guns; seriously, it’s not worth risking your health due to laziness.
LET’S GET STARTED
Let’s get that rifle apart and start the cleaning!
Gather all of the above supplies. A standard 5.56 AR-15 is .22 caliber, so dig out the cleaning rod and .22 caliber marked jag and put them together.
The AR-15 comes apart really easily. Push your rear pin out until the upper and lower pivot apart; it’s just behind your safety selector. The pin is captured so don’t try to remove it completely. You can clean your gun like this or you can push the front pin out too and take the two halves completely apart.


Pull back on your charging handle gently to release the bolt carrier. Slide your bolt carrier out the back of the upper receiver and set it aside for later cleaning. Pull the charging handle backward until it drops down into the upper receiver and remove it for later cleaning.


Wipe down the inside of the upper receiver and chamber with solvent. Run a solvent-soaked patched down the bore and set your upper aside for a couple of minutes so the solvent can do its job.
CLEANING THE BOLT AND CARRIER
Next, let’s focus on your bolt and carrier. This is where your extra tools come in really handy. The front “geared” looking part is the bolt, the rear is the carrier. With the bolt facing forward, remove the cotter pin on the left side of the carrier. Some nicer carriers have an upgraded pin but they all function the same, they keep the firing pin from falling out.

With that pin removed, tip the front of your bolt carrier up and let the firing pin fall out of the rear. If your rifle is really dirty, it may take some gentle persuasion to drop free, just tap it against your workbench a couple of times.

Next, we will remove the bolt cam pin. On the top of the bolt carrier, you’ll see the gas tube pointing forward. Below the gas tube is the bolt cam pin. With your bolt pushed in, you’ll see that the cam pin cams to the left side of the carrier. Twist the cam pin 90 degrees and pull up to remove it. Without the firing pin in the bolt carrier, the cam pin will spin freely, don’t worry it’s not broken. Pull forward on the bolt to remove it from the carrier.

This is typically the furthest you need to disassemble your bolt and carrier for cleaning. If need be we can go into further bolt disassembly and cleaning next time.
Wipe down the inside and outside of the carrier with a solvent-soaked patch. The inner chamber of the carrier tends to build up carbon so focus your efforts there.
Wipe down the bolt with a solvent-soaked patch. Clean the bolt head and check that the extractor claw is free of debris and that eject piston can move; I usually just push on it with the firing pin to make sure that it moves freely.
At the base of the bolt are 3 gas rings. Make sure that they can spin freely, are clean of any carbon or lead, and that the slots on the rings don’t overlap.
Below the gas rings are where most of the carbon will build up on the bolt. If you have a tool with a carbon scraper, remove what carbon you can. This area doesn’t have to be new, just clean it to the best of your ability.
Quickly wipe down your charging handle and make sure it’s mostly free of carbon, it’ll probably be filthy.
UPPER RECEIVER CLEANING
Now that the bolt and carrier are clean, let’s turn to the upper receiver. Grab a rag or shop towel and clean out the inside of the upper receiver and scrub out the chamber with your chamber brush. Soak some patches in solvent and run them through the barrel until they come out clean; your bore doesn’t need to be factory new, just fairly clean. Run a dry patch or two after to make sure all of the solvent is removed. Lastly, run a patch lightly soaked in CLP down the bore and follow up with a dry patch. You want the barrel to have the slightest bit of oil on the lands and grooves to keep corrosion out, especially if you plan to leave your rifle sitting around for any period of time, looking at you safe queen owners.
CLEANING THE LOWER RECEIVER
The last bit of cleaning to do is the lower receiver. Not a whole lot here. Wipe down the fire control group area and your magazine well and make sure the buffer is clean.
REASSEMBLY AND LUBE
It’s now time to reassemble and lube your gun. Let’s start with the bolt carrier.
The bolt goes into the front of the carrier with the extractor on the right side. Look down from the top at the cam pen slot to make sure that the holes line up. Insert the cam pin and twist it 90 degrees. Put in your firing pin from the rear of the carrier. Insert the cotter pin on the left side of the carrier and make sure that the firing pin moves freely within. Pull forward on the bolt and make sure it’s in the extended position, this is how it needs to be to go back into the upper receiver.
Run a little bit of CLP down the rails on the bolt carrier, they are the flat sections on the bottom and top of the carrier. The AR15 likes to run a bit wet so don’t feel bad if you get a little extra oil here and there. Wipe a bit of lube on the charging handle as well.
Your charging handle goes in first. Remember that it has to go in and up, not just straight into the rear of the upper receiver. If you look in, you’ll see the slot that the charging handle fits into. Don’t go pushing your charging handle all the way in yet though, the bolt carrier has to go in as well. Push the charging handle part of the way in then fit your bolt carrier in under it. Push both forward until the charging handle clicks in place and the bolt locks in. If you can’t get your carrier to seat fully, remove it and make sure that your bolt is extended, not compressed.
Reassemble your upper and lower and reinsert your pins.
Last thing to do is function check your rifle. Make sure you don’t have any ammo or magazines around, we don’t need any trouble at the final stage. Charge your rifle and put it on safe. Pull the trigger to make sure it doesn’t go click. Put it on fire and pull the trigger to make sure it does go click.
Your rifle is ready for life and liberty, and the pursuit of happiness at your next range trip.
Patrick “BabyfaceP” James is a garage gunsmith who loves anything mechanical. His motto is “With enough time and patience we can build anything and together we are learning the best way to build all things gun related.”